

Friday, April 16, 2010
Round II: ABC Project...
G. What's G for? I knew that I wanted to do my son's sly grin. Its just so cute... and well for lack of a better word... grinny!!

Round II: ABC Project...
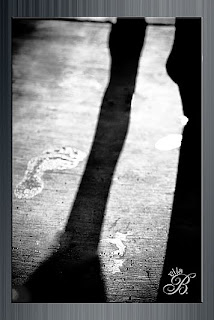
F... F is for lots of things, but this little footprint was actually inspired by my daughter. She is a budding photographer, with her little Nikon point and shoot she gets some really awesome shots. She loves to play with my SLR, but that's mama's toy, and I always get a little more than nervous when she's playing with it. Anyway, she gave me the idea, and showed me a picture of her footprint - but - being an almost 15 year old, she was 'grossed out' by the size of her foot. Silly girl.
Many of you may have met her, as she has accompanied me on many shoots.
Many of you may have met her, as she has accompanied me on many shoots.

Tuesday, April 13, 2010
Round II: ABC Project...
E is for eye... I had trouble with E. Last time I did edge, and wanted something different... So of course I as my Facebook family what their thoughts were, and got a ton of really excellent (haha) suggestions. I decided to pick eye.... One, because I have lots of them around here, and all of them are exquisate. (haha, again).
Eyes really are a window to a soul, at least I think so. And as a photographer, I really love eyes in a photograph. Eyes are something I love to enhance, and although its taken me a little while to get my technique just right, I think I have come a long way since my over-enhancing days.
Do you use photoshop for editing? Here's a quick 5 minute eye enhancing technique to try. I do this on my 'eyes', as well as a few other tweaks.
Open your image, press control + j to create a new layer. With your dodge tool set to about 45% opacity, color over the top layer. Do this for both midtones and highlights. Next, grab the burn tool (I prefer this @ 100% opacity) to enhance just the outside of the color, where it meets the white. I am sure there is a more technical name for this, but... uhm, yea, let's just go with that. There... click off and on the layer you painted on, to see the difference, and adjust your layer to your liking. Flatten your image, and voila, quick & beautiful editing. Have fun!
These are my boys... older J on the left, and younger J on the right. They have amazing eyes!

Subscribe to:
Comments (Atom)